
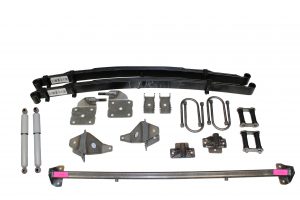
Description
AS-2020CGY Complete Leaf Spring Rear End Mounting Kit for 1948-1952 Ford Pickup Truck (Gas Shocks)
Bolt on kit for the 1948-1952 Ford 1/2 ton pickup tuck. kit fits a wide variety of rear ends (up to 3″ axle housing diameter) depending on the off set of wheels and tire choice. Specify Rear End.
This kit includes:
Chassis Engineering 2-1/2″ slider springs
front and rear spring mounts
shackles
u-bolts
spring pads
shock mounting kit
new gas shocks
hardware
instructions
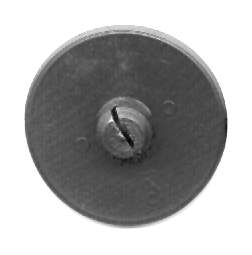
au-0082-suspension-bump-stops-small.jpg
Prevent your suspension from bottoming-out and expensive vehicle damage by including a pair of adjustable rubber snubbers with your order.
Installation Instructions for AS-2020CGY Bolt On Complete Rear End Mounting Kit for 1948-1952 Ford Pickup
Important note: the instructions below cover the steps for the entire rear-end when using our products. If you use different components, or similar products purchased from a different company, some steps are likely different.
1. Remove 4 original rear spring mounts by drilling out rivets. Be careful because the holes are reused.
2. Hold new mounts in place by matching holes. Note that the rivet heads on the bottom frame lip will hit. Grind the rivets flush with the framelip for clearance.
3. Drill rivet hole out to 13/32″. Be sure bottom frame lip is 90 degrees to the side.
4. Bolt the 4 new mounts to the frame, see illustration below for positioning.
5. Install springs leaving shackles loose. Slide rear-end in place and connect the shackles. Place spring pads between spring and rear end.
6. Center rear-end side to side on springs. Spring center bolts should be 33 3/4″ apart.
7. Install U-bolts and bottom spring plate. Sway bar hole goes forward and to the outside of the spring. Angle the shock mount down to start. Lightly tighten U-bolt nuts.
8. We recommend putting weight on the springs before setting pinion angle. Set angle 1 degree less than the transmission angle. If you want to guess at the pinion angle, set it 4 degrees upward compared to the spring pads. You can do this without installing the rear-end in the car. The angle can be adjusted later with spring wedges if needed.
Spot-weld pads to the rear-end, then remove rear and weld pads. Reinstall rear-end and tighten U-bolts.
CAUTION: Be sure rubber stops are in place between frame and rear-end to prevent shock-bottoming. If the shock bottoms while driving, sooner or later, something will break.
Note: Rubber stops are not included in the kit. Use stock or repro.
Shock Mounting:
1. Shock bar fits inside the frame in the position shown below:
Tubes extend forward. Position with weight on the springs. Shocks must clear the rear-end housing and be able to move freely. Mark the location and remove the bar from inside the frame. Turn bar over and turn it side to side. Clamp under frame to mark holes for drilling. Drill to 13/32″.
2. Install bar inside frame. It may or may not require a hammer tap to get it inside and in place. Once inside the frame, locate it over the holes you just drilled.clamp in place, and locate the four side holes for drilling. Slide bar out of the way and drill these 4 holes.
3. Put bar in place and lightly bolt to bottom lip. At this point you will notice a space between the bar and the side of the frame. Fill this space with a washer (equally on both sides). Install bolts and tighten.
4. Install shocks and washers, and tighten.
Swaybar (SB-4852R), not included in kit
1. The rear sway bar mounts using the 4 (bottom lip) shockbar mounting bolts. Remove bolts and install swaybar clamps (with bar). Arms go forward over the rear axle. Bolt the bar in place.
2. The bottom mount is part of the Chassis Engineering rear-end mounting kit and should already be installed. If you don’t have our shock kit or complete rear end mounting kit, this mount must be fabricated, and the mounting location of the bar should be determined by the installer. When mounting the bar (without the aid of the other kits), the outer arms of the swaybar should be at 90 degrees to the end links and parallel to the ground with suspension at ride height (under total rear vehicle weight compressing springs).
3. Add the links to finish the installation.
![]() WARNING: This product can expose you to chemicals including nickel and urethane, which are known to the State of California to cause cancer and birth defects or other reproductive harm. For more information go to www.P65Warnings.ca.gov.
WARNING: This product can expose you to chemicals including nickel and urethane, which are known to the State of California to cause cancer and birth defects or other reproductive harm. For more information go to www.P65Warnings.ca.gov.


Reviews
There are no reviews yet.