 1")
Description
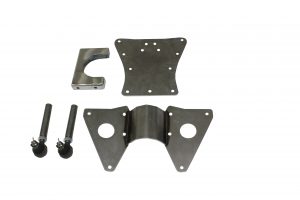
Chassis Engineering AT-1054 comes as a Bolt-on Universal Transmission Crossmember with a 4 inch drop, specifically made for 1936-1954 Chevrolet Top Hat-style frames.
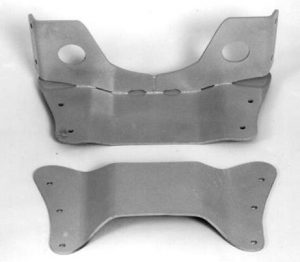
This transmission crossmember comes with specially designed frame reinforcement caps to keep stress on the frame sidewall as low as possible.
Chassis Engineering Transmission Crossmember tubes are internally reinforced, heavy duty 1 3/4 inch OD tubing with a 3/16 inch wall.
Don’t forget to include a transmission cushion with your order:
SS-0112 – for 4 speed, PowerGlide and Turbo 350 transmissions
SS-0114 – for Turbo 400 and Turbo 700 transmissions
SS-0212 – for Ford C4 transmissions
Note: Requires some fitting to individual frame. Mock-up installation, cut the crossmember tube to length, weld on the mounting flanges and bolt everything in place.
If you prefer, we also offer the AT-1055 Transmission Crossmember for Chevrolet Top-Hat Frames, which mounts underneath the frame for additional clearance.
Installation Instructions for Bolt-on Transmission Crossmember for 1936-1954 Chevrolet Top Hat type frames.
Once original engine and transmission have been removed, remove original transmission crossmember and anything that will interfere with the new crossmember (such as the battery box or apron).
Step 1: Transmission Mounting
Place reinforcing plate over frame and tap into place.
Step 2: Prepare crossmember for cutting by holding it under the frame and marking the excess material.
Remove and cut to length.
Step 3: Place crossmember and flanges in their final position. Tack-weld tube to mounting flanges. We recommend a double-check now with engine and transmission in place. Remove and finish the weld.
4. When sure of spacing, drill all eight 3/8″ holes through the inside of the frame. If installing with body on frame, outer holes may prove hard to center. Use a sharp center punch thru inner frame to mark outside. The dimple punched in outer frame can then be checked for correct placement. If not correct, punch a new dimple using mark as locating aid. When located properly, drill through the frame from inside out.
5. Bolt transmission crossmember into place. CAUTION: Do not tighten lower bolts to excess. Without tubes welded in the frame, you can buckle sides.
6: Transmission floor cover plate may need to be clearanced to miss transmission.
![]() WARNING: This product can expose you to chemicals including nickel and urethane, which are known to the State of California to cause cancer and birth defects or other reproductive harm. For more information go to www.P65Warnings.ca.gov.
WARNING: This product can expose you to chemicals including nickel and urethane, which are known to the State of California to cause cancer and birth defects or other reproductive harm. For more information go to www.P65Warnings.ca.gov.


Reviews
There are no reviews yet.